Detecting neuropathy in the diabetic foot is crucial for patient care, which is why the 10-step monofilament test is a must when it comes to injury and ulceration prevention.
Healing patients and helping them get on the road to recovery are always at the top of any wound clinician’s list. We are always on alert and in constant assessment mode, looking for ways to prevent further complications or possible injury. So when a patient also happens to be diabetic, our assessment mode goes into overdrive.
One of the most common complications of diabetes is neuropathy, or nerve damage of the extremities. With sensory neuropathy, the patient loses protective sensation and the ability to feel pain and temperature changes. Without protective sensation, the diabetic patient is at an increased risk for foot injury or ulceration, and may not realize anything is amiss until there are serious complications.
Neuropathy Screening
This is why testing your diabetic patients for neuropathy is so important. In fact, the American Diabetes Association recommends that we screen diabetic patients for neuropathy annually, at minimum. Once we note any diminished sensation, we should check quarterly.
One way to assess protective sensation in the diabetic foot is to perform a Semmes Weinstein 10g Monofilament Test across designated sites on the foot. The test uses a 5.07 monofilament that exerts 10 grams of force when bowed into a C-shape against the skin for one second.
How to Perform the Semmes Weinstein 10g Monofilament Test
The test procedure is as follows:
- Use the 10gm monofilament to test sensation.
- Have patient close his or her eyes.
- Apply the filament perpendicular to the skin’s surface.
- Be aware that the approach, skin contact and departure of the monofilament should be approximately 1.5 seconds in duration.
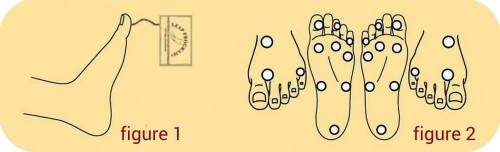
- Apply sufficient force to allow the filament to bend. (Figure 1).
- Do not apply to an ulcer site or on a callous, scar, or necrotic tissue.
- Do not allow the filament to slide across the skin or make repetitive contact at the test site. Randomly change the order and timing of successive tests.
- Ask the patient to respond, “Yes,” when he or she feels the filament.
- Document response when felt, and test for sensation (Figure 2).
- Be aware that neuropathy usually starts in the first and third toes, and progresses to the first and third metatarsal heads. It is likely that these areas will be the first to have negative results with the 10gm monofilament. Repeated testing can demonstrate vividly to the patient the progression of the disease.
Record the results on the screening form, noting a “+” for sensation felt, and a “-” for no sensation felt. The patient is said to have an insensate foot if they fail on retesting at just one or more sites on either foot. Injury is much more likely to occur in these insensate areas and we must take protective measures. Provide patient education verbally and in writing, such as these materials from the American Diabetes Association, and be sure to do a good shoe fit assessment as part of your care plan.
Do you administer the Monofilament test?
Are you familiar with the Semmes Weinstein 10g Monofilament Test, and do you administer it on a regular basis to your diabetic patients? Has monofilament testing produced significant results in terms of prevention and assessment? We are interested to know about your experiences in diabetic foot testing, so please leave your comments below.

Click to download this easy-to-use resource for performing foot examinations.
The post Diabetic Wound Care: Monofilament Testing appeared first on WCEI Blog.


